Do you want to create a simple rich text editor? well! this tutorial explains how to create a simple rich text editor using HTML, CSS, and jQuery. In order to make a simple rich text editor, we’ll use a lightweight WYSIWYG jQuery plugin that helps us to perform basics text formatting commands.
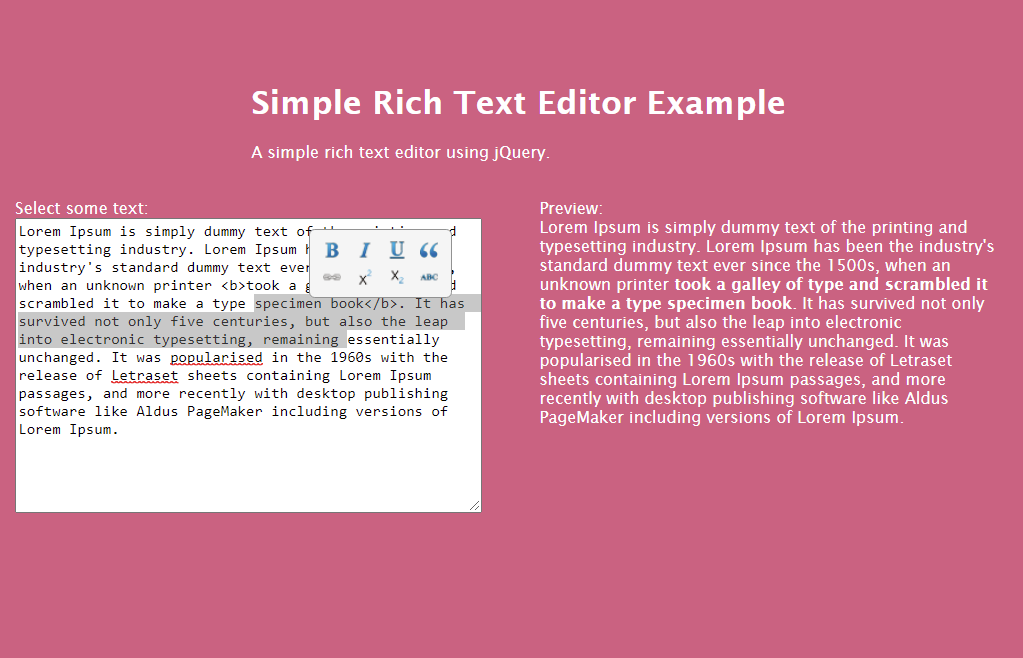
This plugin comes with a textarea for text input and a preview area for real-time text formatting preview. When you select text from the textarea, the plugin shows an iconic context menu to perform text formatting commands. Users can easily perform bold, italic, underline, link, super, base, and quotation commands on the selected text. You can check all these text formatting options on the demo page.
The text-editor layout can be controlled in HTML and CSS. Mean to say, you have full control over the editor’s layout and design. You are absolutely free to style the text editor according to your needs. Similarly, the context menu is also customizable. Basically, there are png image icons inside the menu, but you can also use font icons if you are familiar with CSS. OK! Now, let’s get started with HTML to create a simple rich text editor.
How to Create a Simple Rich Text Editor
In HTML, create a textarea with id “description” (for input) and a div element with id “preview” that will show the output. Similarly, create a div element with id name "menu" and place menu items for text formatting commands. Wrap all these elements into a div element and define its id "wrapper". So, the following is the complete HTML for the rich text editor.
<div id="wrapper">
  <h3>Simple WYSIWYG Web Editor</h3>
  <div>
    Select some text:<br />
    <textarea id="description"> </textarea>
  </div>
  <div>
    Preview:<br />
    <div id="preview">
    </div>
  </div>
  <div id="menu">
    <li id="bold"></li>
    <li id="italic"></li>
    <li id="underline"></li>
    <li id="blockquote"></li>
    <li id="link"></li>
    <li id="sub"></li>
    <li id="sup"></li>
    <li id="del"></li>
  </div>
</div>
You can also place some text inside the textarea and preview section if you want to show some preloaded editable content.
The CSS Styles
After creating HTML, select the wrapper id in CSS and define its styles. Define its width and margin property as described below. Likewise, select child div of wrapper element, float it to the left, and define 50px value for the margin-right property to have a gap between input and preview section.
#wrapper {
  width: 960px;
  margin: 50px auto 0;
}
#wrapper div {
  float: left;
  margin-right: 50px;
}
Now, select textarea and preview element and define 400px value for the width property. You can also set border and background colors according to your needs.
textarea {
  width: 400px;
  height: 250px;
}
#preview {
  width: 400px;
  border-radius: 5px;
}
Target the #menu id and define its width, padding, background, and border property as follows. In order to make it a context menu, keep its position absolute and display it none (as we’ll show it on text selection event). Similarly, specify styles for list items and hover style as described below:
#menu {
  width: 112px;
  padding: 5px;
  background: #F5F5F5;
  display: none;
  position: absolute;
  top: 0px;
  left: 0px;
  overflow: hidden;
  border: solid 1px #929292;
  border-radius: 5px;
}
#menu li {
  padding: 3px 5px;
  border: solid 1px transparent;
  float: left;
  display: block;
  width: 16px;
  height: 16px;
  cursor: pointer;
}
#menu li:hover {
  border: solid 1px #BEA881;
  background-color: #FFF2CB;
  border-radius: 5px;
}
As you have seen on the demo page, the context menu for different commands contains png icons. Select each list item with its id and place the image icon (as background) as follows:
#bold {
  background: url(https://img2.uploadhouse.com/fileuploads/17491/17491541ef7f7666be6a203fd971396f987eb752.png) no-repeat center center;
}
#italic {
  background: url(https://img3.uploadhouse.com/fileuploads/17491/174915395ab347e382d8f68bb33dade17518e68a.png) no-repeat center center;
}
#underline {
  background: url(https://img3.uploadhouse.com/fileuploads/17491/174915354990c5dad9c4626eb63650e78ba252ad.png) no-repeat center center;
}
#blockquote {
  background: url(https://img5.uploadhouse.com/fileuploads/17491/17491542c5456098c95e20178ec3a822d71ff91d.png) no-repeat center center;
}
#link {
  background: url(https://img2.uploadhouse.com/fileuploads/17491/17491540f157fa1b061a4b9afda62d243ed3f029.png) no-repeat center center;
}
#sub {
  background: url(https://img1.uploadhouse.com/fileuploads/17491/174915370bbc8a25df744f4573a3340c8f232aa1.png) no-repeat center center;
}
#sup {
  background: url(https://img9.uploadhouse.com/fileuploads/17491/174915369217c1dfbef6a3aa88a0a122726b28d5.png) no-repeat center center;
}
#del {
  background: url(https://img4.uploadhouse.com/fileuploads/17491/17491538c153871b868e0e5280d6c7fffe828233.png) no-repeat center center;
}
jQuery Function for Text Editor
Before including the text editor’s jQuery function, make sure you have loaded the jQuery file into your project. You can load jQuery by adding the following CDN link into the head tag of your HTML page.
<script src='https://cdnjs.cloudflare.com/ajax/libs/jquery/2.1.3/jquery.min.js'></script>
Finally, add the following jQuery text editor function (wrapping with <script> tag) before the closing of the body element and done.
$(function() {
var URL, Abbr;
var mouseX = 0;
var mouseY = 0;

$("#description").mousemove(function(e) {
  mouseX = e.pageX;
  mouseY = e.pageY;
});

$("#description").mousedown(function() {
  menuFadeOut();
});

$("#description").select(function() {
  $("#menu").css("top", mouseY - 80).css("left", mouseX - 50).fadeIn("1000");
});

$("#bold").click(function() {
  wrapText("<b>", "</b>");
  menuFadeOut();
});

$("#italic").click(function() {
  wrapText("<i>", "</i>");
  menuFadeOut();
});

$("#underline").click(function() {
  wrapText("<u>", "</u>");
  menuFadeOut();
});

$("#blockquote").click(function() {
  wrapText("<blockquote>", "</blockquote>");
  menuFadeOut();
});

$("#link").click(function() {
  getURL();
  if (URL.match(/^http:/)) {
    wrapText("<a href='" + URL + "' target='_blank'>", "</a>");
    menuFadeOut();
  }
  else  {
    wrapText("<a href='http://" + URL + "' target='_blank'>", "</a>");
    menuFadeOut();
  }
});

$("#sub").click(function() {
  wrapText("<sub>", "</sub>");
  menuFadeOut();
});

$("#sup").click(function() {
  wrapText("<sup>", "</sup>");
  menuFadeOut();
});

$("#del").click(function() {
  wrapText("<del>", "</del>");
  menuFadeOut();
});
function wrapText(openTAG, closeTAG) {
  var desc = $("#description").val();
  var selStart = $("#description")[0].selectionStart;
  var selEnd = $("#description")[0].selectionEnd;

  var text = desc.substring(selStart, selEnd);

  var before = desc.substring(desc, selStart);

  var after = desc.substring(selEnd, desc.length);

  $("#description").val(before + openTAG + text + closeTAG + after);
  $("#preview").html($("#description").val());
}
function getURL() {
  URL = prompt("Enter valid URL");
  if (URL === "")  {
    getURL();
  }
}
function menuFadeOut() {
  $("#menu").fadeOut(1000);
}
});
That’s all! hopefully, you have successfully implemented this simple rich text editor jQuery plugin into your project. If you have any questions or suggestions, let me know by comment below.